Create the Solution and Project name and schema etc as mentioned below
Object : Finding summary of Employees from Employee table and transform to XML file. The extracted data would be sending to new File Share location.
Solution Name : SqlReccteiveTest.sln
Project Name : SQLReceiveTestProject
Map Name : mapEmployeeSummary.btm
Schema Names : EmployeeSummary.xsd , SQLService_EmployeeData.xsd
Orchestraion Name : SQLReceivePortTest.odx
Create a simple Table in SQL Server database as mentioned below.
CREATE TABLE [dbo].[Employee](
[EmployeeName] [varchar](50) ,
[JobGrade] [char](1) ,
[NetSalary] [money] NULL
) ON [PRIMARY]
Step-1 : How to extract Employee Table from BizTalk ?
Select your Project (SQLReceiveTestProject) then Right click (mouse) and click ADD and select “Add Generated Items” you can find the below screen.
Then Click on ADD to continue to generate the schema.
Once its moves to next screen you need to identify the SQL Adapter from the list of adapters shown in the box and click Next , you will find the next screen and click SET Button.
(Note : SQL Server Name and Database Name at this point of time )
Here is the place you need to enter your SQL server Name and your Database name
(If you are Sql server authentication mode then enter UserID, Password of your Server)
The next screen prompts you to enter the schema specifications like TargetNamespace, PortType and document Root element Name. Enter the Details as mentioned below.
TargetNameSpace : http://SQLReceive/EmployeeData
Port Type : Receive Port
Document Root Element : EmployeeRoot
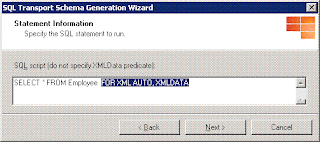
In the below screen you can find the couple of Keywords are highlighted, these keywords are mandatory to append your Complex Query which helps adapter to generate your records into XSD schema.
For your better understanding of XML Auto and XMLDATA visit :
http://msdn.microsoft.com/en-us/library/ms188273.aspx

Observe your schema has the root element name as “EmployeeRoot” and the target name as
http://SQLReceive/EmployeeData. (These details you entered while you extract the schema)
Step-2: How to Map your Employee Schema to Employee Summary Schema?
Select your Project (SQLReceiveTestProject) then Right click (mouse) and click ADD and select “New Item”.
Select the “Schemas Files” from the BizTalk Project Items and Select “Schema” form the Visual Studio Installed templates. This screen prompts you to enter the Name of the Schema in bottom
of the screen. Write “EmployeeSummary.xsd” as your new Schema name.
EmployeeSummary ( root)
EmployeeData (Record)
EmployeeName (Field)
EmployeeJobGrade (Field)
EmployeeNetSalary (Field)
Creating Map
Select your Project (SQLReceiveTestProject) then Right click (mouse) and click ADD and select “New Item”.
Select the “Map Files” from the BizTalk Project Items and Select “Map” form the Visual Studio Installed templates. This screen prompts you to enter the Name of the Map in bottom of
the screen. Write “mapEmployeeSummary.btm” as your new map name.
MapEmployeeSummary map contains source and destinations of the schema, which you would like to transform. Select SQLService_EmployeeData.xsd as your Source and EmployeeSummary.xsd as your destination schema
Source Schema : SQLService_EmployeeData.xsd
Destination Schema : EmployeeSummary.xsd
Map your Fields accordingly the final mapping should look as shown in below screen shot.
Step-3: How to transform your Employee data to xml File?
Creating Orchestration
Follow the Step 2 (Fig 1.5) to create orchestration and name it as “SQLReceivePortTest.odx”.
Drag and Drop the Receive, Send and Transform shapes into the orchestration design layout.
Add 2 new messages and name it as receiveSQLMsg and sendXMLMsg respectively.
Set the properties for each shape and Messages as mentioned below.
Message properties :
ReceiveSQLMsg
MessageType : SQLReceiveTestProject.SQLService_EmployeeData
sendXMLMsg
MessageType : SQLReceiveTestProject.EmployeeSummary
Receive and Send Shape properties :
Receive Shape
Message : receiveSQLMsg
Name : receiveSQLTableData
Operation : receiveSQLTablePort.ReceivePort.Request
Send Shape
Message : sendXMLMsg
Name : SendXMLFile
Operation : sendXMLFilePort.SendPort.Request
Construct Message
Message Constructed : sendXMLMsg
Name : Convert SQLMsg To XML Msg
Transform Shape
Input Messages : receiveSQLMsg
Map Name : SQLReceiveTestProject.mapEmployeeSummary
Name : SQL to XML
Output Messages : sendXMLMsg
After complete the above steps you will find the orchestration as mentioned below

Generate SN key (ex: abc.snk) add generated SN key to your Project and
(Project -> Properties -> Assembly -> Assembly Key File = abc.snk ) deploy your application
Go to BizTalk Admin Console and Biztalk Group, you can find your application sitting under the list.
(Assume that you mentioned the proper application name in Project properties)
Step-4: How to Configure the Application and execute ?
Development part has completed and the configuration comes into the picture now. In this section you need to understand how to configure your application with receive and send ports and how to call your existing extracted schema in receive port.
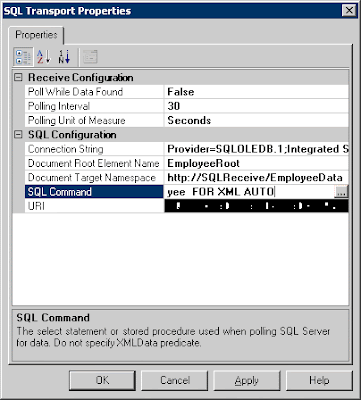
Create Receive Port and name it as “ReceiveSQLTableDataPort” and then create Receive Location name it as “receiveTableData”. Here you need to be bit careful to configure your sql Server settings to pick the data from your right database and table.
SQL Port Configuration properties :
Connection String : Provider=SQLOLEDB.1;Integrated Security=SSPI;
Persist Security Info=False;Initial Catalog=YourDBName;
Data Source=ServerName
Document Root Element Name : EmployeeRoot
Document Target Namespace : http://SQLReceive/EmployeeData
SQL Command : SELECT * FROM Employee FOR XML AUTO
(Make sure that you did not enter the XMLDATA keyword at this level)

The final output(Summary of Employees) has converted as XML File , here you need to Create new Send Port which grab the XML message from BizTalk message box and send to destination folder.
Send Port and name : SendXMLFile
Transport Type : FILE
Send Pipeline : XMLTransmit
File Transport Destination Folder : D:\SQLTest\
File Name : %MessageID%.xml
Final Binding of your receive and Send ports to Orchestration as shown in Screen shot.

Once you complete the above step Enlist your Ports and start the application. You can find the output xml File in your D:\SQLTest\ Folder. Each file will be generated with unique MessageID.
Hope you received the message without any issues. If you have any issues check the ports are configured properly or SQL Server is up and running properly.


This is Good information about this topic..I like it.. wordpress database fix ..Keep it Up!
ReplyDelete