Friday 22 August 2008

Virtual World - Installing Virtual PC

Virtual World

What is Virtual?

I have been hearing the word Virtual from many people and I was bit curies to know what all about virtual. Till I learn about Virtual i had a big hype about virtual in my mind, now I can talk some thing about virtual.
A simple definition of Virtual is Existing in essence, in other hand (technical aspect) you can say nothing is required physically. I know you can give many other better definition then man… Cool

For some of the best examples are

Virtual PC - You can install your workaround soft wares without get disturb your simple desktop OS.

Second Life
– It is an Online, 3D Virtual Game. You can discover new friends, fashion, Music, videos and fun virtually. http://secondlife.com/


Indian Famous Stock market broker site
– You can do online trading virtually (no money required to invest – No money comes to your pocket also :-) ) http://moneybhai.moneycontrol.com

Today I am describing how to install Virtual PC on your Desktop/Laptop without get disturbed of your primary Operating System.

Hope most of you experienced installing dual operating systems on your Home PC and faced lot of issue like “DLL Hell” , Missing components ( when you uninstall some software which get impact of your primary OS). Now take a deep breath and get relax – you know why?? Virtual PC does not have such complications. You just need to install all your soft wares in you Virtual Hard Disk (Any time you can Delete with out get impact of your primary OS).

Easy Steps
Download the Virtual PC 2007 from the below link
http://www.microsoft.com/downloads/details.aspx?FamilyID=04d26402-3199-48a3-afa2-2dc0b40a73b6&displaylang=en
Install your Virtual PC 2007 on your Primary OS ( by clicking Next – Next –Next) and then restart your PC.


Install your Virtual PC 2007 on your Primary OS ( by clicking Next – Next –Next) and then restart your PC.


While you install VPC you may get below warning message for Windows vista Home Premium users


You are reading that VPC is not supported on Vista Home Premium, not that it does not run. It does run. "Not Supported" means that Microsoft will not give you technical help for any problems you encounter. VPC is supported by MS on Vista Business, Enterprise, and Ultimate....

Don’t worry much its only a warning It means that you will not get any Support for if any issues occurred.

Apparently you can install Windows vista Service Pack-1 and Virtual PC 2007 Service pack-1 for better connectivity.

Windows Vista Service pack : http://www.microsoft.com/downloads/details.aspx?FamilyID=B0C7136D-5EBB-413B-89C9-CB3D06D12674&displaylang=en

VPC 2007 Service Pack : http://www.microsoft.com/downloads/details.aspx?familyid=28C97D22-6EB8-4A09-A7F7-F6C7A1F000B5&displaylang=en

It always recommended upgrading your system with updated patches
Let us start create a new Virtual PC, I am giving any explanation for each screen.
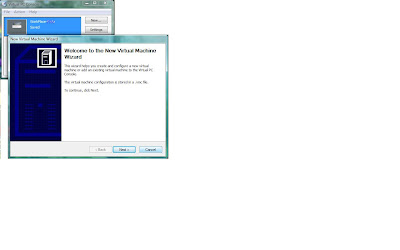
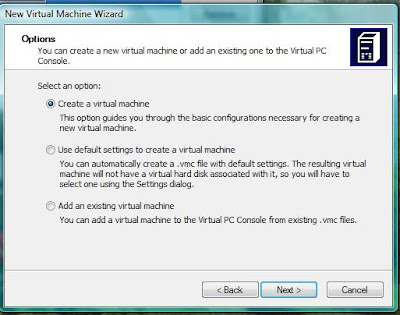
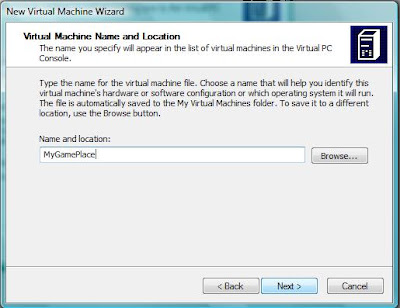


In below screen you can see various OS. It doesn’t mean that it installs the OS automatically.
(Many people had this feeling...). It creates only the basic setup . You need to install your OS with your CD/ Image File. Like how you install operating system in your band New System.
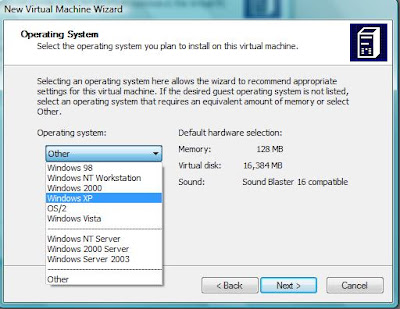


If you would like to install Linux/ Unix or any other OS you can select Other Option.


If you already installed any Virtual hard Disk then you can choose that disk other wise you can selct New virtual Hard Disk option , it creats the disk for you.
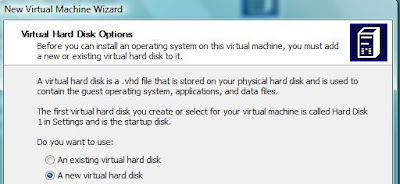
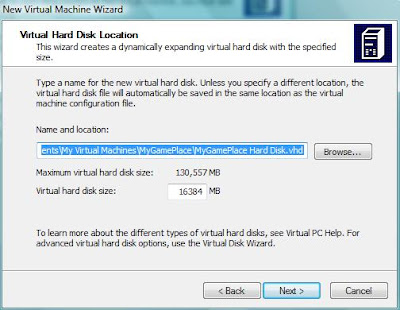
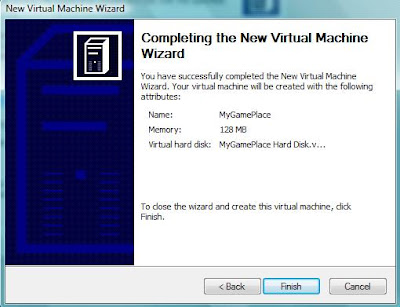


Once Finish your installation go to your VPC Console and Click Settings you can see the below screen. Here you can increase your RAM from 128 to 512 / 1GB Ram.

Note : do not change any other settings , Leave it with default settings except RAM settings.
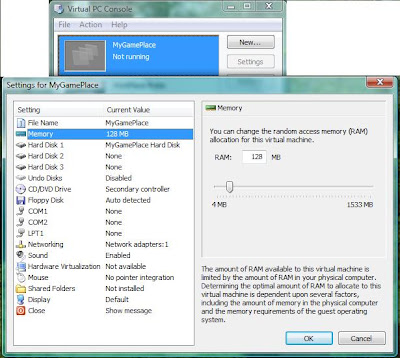


Select CD from Menu and select your CD Drive / Capture Image option to start install your OS.


Hope the screen shorts are enough to understand how to install VPC. If you need any more help

Reach me @ raj.webjunky@yahoo.com


Thursday 21 August 2008

How to use Environment Variable in BizTalk Server


Why Where and How to use Environment Variable in BizTalk Server

In general Global Environment variables are offen used to specify the Folder paths to shorten the path.

I have been Installaling my Biztalk MSI’s which I got it from my Developers and getting confused to find the path where the DLL are storing in my TestServer.

As you aware each developer maintain the different folder staructrure. You can ask a question what is the big deal to maintain a different folder structrue? Yes you are correct, you can maintain your own folder structure and create a BizTalk Project however, once you deploy the interface and Build the MSI you can see the Source and Destination Location of each DLL (Biztalk Administration Console -> application-> Resource) deployed in your machine.

What is Destination Location ?
This is the path your assemblyes are going to be copied when you deploy your MSI in any other Remote system(TestServer). If you maintain different folder structure it creates similar Folder structure in your TestServer while deploy.

I found some better solution to make it standardize this Destination path. This document explains you how to create Global Environtment Variables and How to use it in BizTalk.

Step-1
MyComputer –> Properties --> Click Advanced Tab --> Click New
And create your new Global Environment Variable(GEV) , Here I am creating MyBizTalkDeployFolder as my GEV and "E:\WindowsVariableTest" is my Location.

Once you created successfully you can use this environment varible in our BizTalk, where ever you want to deploy your MSI you create similar variable ( Repete Step-1) and specify your path.

Note: Be carefull while you create, do not tempt to delete any existing environment variable you may endup with un-necessary errors when you restart your system.


Step-2
Now we need to use this GEV in our BizTalk Goto Resource and select your Assembly and Click Modiy as shown in below Image.

Step-3
Enter your Global Environment Variable between two % Character in Destination Location path.And build your MSI.


Repeate Step-1 in any of your Virtual PC / any Test Server and deploy your MSI and check the path which you mentioned for GEV. You cand find all your assembly files.

Some time you may get LongString error which you can avoid using Environment Variables.


If you need any more clarifications, reach me @ raj.webjunky@yahoo.com.


Multiple Files Select without Keyboard Windows Vista

How to Select Multiple Files without using Control key(board)- Windows Vista?

I am back to Home after hectic work at office and just trying to relaxing myself.I am totally tired and became very lazy to move out of my bed so, I connected to my wireless mouse to my new Laptop and stated hearing songs.

I am trying to select favourite songs from my Bulk list( could be a 300songs list) I was bit frustrated to select items from my list without using my keyboard( Control + Select Items), Then I started digging into Windows Vista features and I found this great future, Hope this could be a useful when you are lazzzzzyyy.

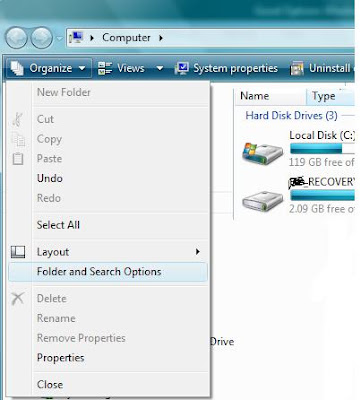
Start --> MyComputer--> Organize(Top Left) and select Folder and Search Options


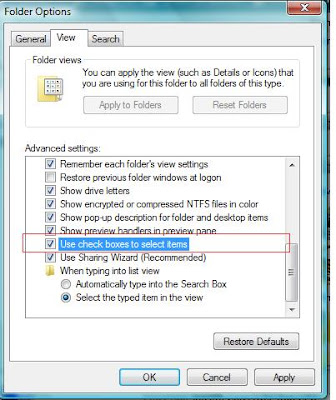
Go to View tab and select Use check boxes to Select items and click Apply.


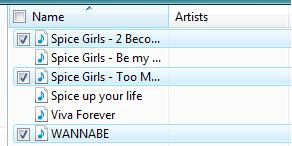
Now you can you hassle free to select your Music list without using keyboard.


It is a small example for “Simple thinks make big difference.......!”

Tuesday 19 August 2008

Partition your Hard disk Window Vista

How to Partition your Hard disk on your Laptop with Window Vista?

I purchased my first laptop recently and I have been trying to partition my Laptop hard disk but I could not figure it out the right software(free downloaded).

I remember very much I was using Partition Magic Software to divide my Bulk Hard disk to various drives(D/E/F...). Now My new laptop come up with 300GB Hard disk and all my experiments failed to portioned my hard disk.

At last I found useful information from Microsoft. Hope this can be useful for you to partition your Windows Vista Operating System based Laptop. Windows Vista had a great feature which does not require any third party tools to partition your hard disk. Follow the instructions below.


Step-1
MyComputer --> Right Click à Manage
Select the Disk Management under Storage of your Computer Management Window.


Step-2
Right Click your C Drive and Select Shrink Volume


If you do not find this option you may required to install the latest Service Pack , download the
windows Visa Service pack : http://www.microsoft.com/downloads/details.aspx?FamilyID=B0C7136D-5EBB-413B-89C9-CB3D06D12674&displaylang=en


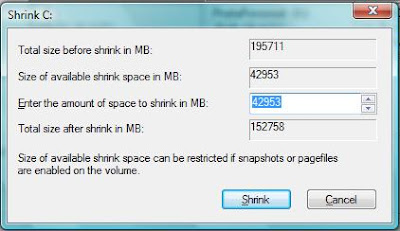
It prompts you to enter the shrink Volume size , remember you need to provide the size in Mega Bytes only (MB). Hope you still remember how much MB for 1 GB ?? ( 1GB = 1024MB)

Once you Click Shrink Button , It creates your Primary Partition drive.


Step-3


Right Click your new Drive and Select Labelling and select Quick Format (NTFS/FAT 32..) and also select your Drive Letter. Remember do not use C, D and E Drive which has already been occupied with your recovery and CD/DVD Drive.


Friday 15 August 2008

Parallel Branching BizTalk 2006

How to use Parallel Branching in BizTalk 2006

Object : How to use parallel Branching in Biztalk 2006
Solution Name : ParallelCheck
Project Name : ParallelCheck
Map : MapSingle.btm,mapOrderInsertSQL.btm,MapMultipleOrders.btm

The word “Parallel” means two or more activities to be run simultaneously without depend on any other object.
When you talk about technical terms two are more objects to be execute simultaneously.

In this example I created an Order form, which can have Single Order details or Multiple Order details. However for each order I need to track the Order data and store into my SQL Table.

For each Single Order form it creates a Complete Order from output file with “Single” as extension and for each multiple order form it creates a Complete Order form output file with “Multiple” as extension. Apparently for each Single and Multiple orders I am trying to track the order details and storing the data in SQL Table. The table structure as defined below.


When ever it receives a Order from the orchestration Parallel branch checks the Orders count and executes the branch accordingly.

You need to write the below sample code for counting the Orders.
OrderCount= System.Convert.ToInt16(xpath(InputOrderMsg,"count(/*[local-name()='Root' and namespace-uri()='http://ParallelCheck.Orders']/*[local-name()='OrderDetails' and namespace-uri()=''])"));

If the form contains only 1 order details then the parallel branch quickly runs into Single Order process branch and performs the action and if order count is 2 or more it goes to Multiple Order Branching.

Simultaneously Track Order branch will execute for each Single or multiple branch executions, and it performs a SQL Insert action using SQL Send port.


For better understanding of how to work with SQL Receive and send port, check the below links
http://rajwebjunky.blogspot.com/2008/02/biztalk-sql-adapter.htmlhttp://rajwebjunky.blogspot.com/2008/06/working-with-sql-adapter-receiveport-4.html


Download the Source code :


If you need any more clarifications, reach me @ raj.webjunky@yahoo.com.

Thursday 7 August 2008

BizTalk Server R2 Download ,Install guide and CAB Files

BizTalk Server R2 Download, Install Guide and CAB Files

I have been trying to find the one website where I can get complete information about free download of BizTalk R2 ,installation Guide and CAB Files.

Everytime I do a anonymous search to find these details , To day I got an idea to club these useful information and documenting on my blog.

Hope you can find these details when you google it , but you might be find the details in various places.

Microsfoft BizTalk R2 Evaluation Download

http://www.microsoft.com/downloads/details.aspx?familyid=54EA1E0C-937A-45DB-B51E-D0C602543EC8&displaylang=en

System Requirements and Installation Guide
http://www.microsoft.com/downloads/details.aspx?familyid=54EA1E0C-937A-45DB-B51E-D0C602543EC8&displaylang=en#Requirements

CAB Files

Windows 2003 Server 32–bit :
http://go.microsoft.com/fwlink/?LinkId=54668

Windows 2003 Server 64–bit : http://go.microsoft.com/fwlink/?LinkId=54659

Windows XP 32-bit :http://go.microsoft.com/fwlink/?LinkId=54686

Windows XP 64-bit :http://go.microsoft.com/fwlink/?LinkId=54677

Windows 2000 Server 32-bit :http://go.microsoft.com/fwlink/?LinkId=54695

Windows 2000 Server 64-bit :http://go.microsoft.com/fwlink/?LinkId=54704


Tuesday 5 August 2008

XSLT Script file using at BizTalk Map

How to Call XSLT Script file instead of BizTalk Map and some of general key words of XSLT programming.

Object : Creating Custom Functoid, which can add leading Zeros and right align for the input number.
Solution Name : XSLT_Test
Project Name : XSLT_Test
Map : mapXSLT.btm
XSD schemas : CommonOrder.xsd, OrderSummary.xsd
XSLT Script File : MapScript.xslt

Some of key thinks for your XSLT programming.


Below mentioned is the basic template for your XSLT mapping


I designed my Input Schema as below.

Write the below sample code instead of <>


I have OrdSummary node in 3 different places and TotalCount and Amount Fields are also same. when I use Count() function It returned to me as the result 3 because I am using // keyword.


Select your Map grid and right Click -> properties and enter your XSLT map name at Custom XSL path(See the image).


Some of useful functions


Count() : Count the node set. Ex : Count()
Sum() : Returns the sum of all nodes in the node-set Ex : Sum ()
concat(string, string, string*) : Concatenate the strings.Ex : concat(“a”, “abc”)
string-length() : Retuns the length of your input Field Ex : string-length()

If you need any more clarifications for XSLT programming , reach me @ raj.webjunky@yahoo.com.