Friday 20 June 2008

DB Lookup map functoids perform Select Query

DB Lookup map functoids perform Select Query

Create the Solution and Project name and schema etc as mentioned below

Object : How to Create Select * from Employee where EmpName=’A’ using
BizTalk DB Lookup Functoids ?


Solution Name : DBLookUpTest.sln
Project Name : DBLookUpProject
Map Name : mapEmp.btm
Schema Names : InputEmp.xsd , DBOutputs.xsd

Create a simple Table in SQL Server database as mentioned below.

CREATE TABLE [dbo].[Employee](
[EmployeeName] [varchar](50) ,
[JobGrade] [char](1) ,
[NetSalary] [money] NULL
) ON [PRIMARY]

Insert few Rows in Employee Table. I got less time to insert many rows so I inserted 3 rows as shown below.
EmployeeName JobGrade NetSalary
-------------- ------------ ------------
John A 5000.0000
MikeMiles A 5600.0000
Armados B 3000.0000

If any one asked you to write a query to find salary based on selected employee, I know you can write within seconds. However to perform similar query in BizTalk you could use sophisticated method. I will guide you how to write same query in BizTalk mapping.

Let say I want to find the Employee John Salary, looking at above table structure I can easily say that its 5000/-. Lets find John same salary via BizTalk mapper.

Create Schemas
1. Add one Field under “InputEmp” Schema as empName - This should be used as
Where clause value in SQL Query.

2. Add 3 Fields under DBOutputs Schema one should filed should be dedicated for database
error descriptions. Here I designed 2 Record Nodes and 2 fields (employeename
and Salary) for EmpData Record node and one field for Status records which holds
the database error descriptions.

You can find my Schema structure as mentioned below.

Root
EmpData
EmployeeName
Salary
Status
ErroDesc

Creating Map
Hope you remember that we need to accomplish the Select Query via biztalk mapper.

Before creating mapper just try to under stand the 3 database functoids Database Lookup, Value Extractor, Error Return Functoids.

Database Lookup: This functoid used to extract information from a database and store it as a Microsoft ActiveX Data Objects (ADO) recordset. This functoid requires four input parameters in the order of lookup value, database connection string, table name and column name for the lookup value.

Value Extractor: extract the appropriate column value from a recordset returned by the Database Lookup functoid. This functoid requires two input parameters like a link to the Database Lookup functoid and a column name.

Error Return : capture information about errors, such as database connection failures, that occur during run time. This functoid requires one input parameter like a link from the Database Lookup functoid to any Error description field

In below image you can identify each functoid.

Now lets start add inputs for Database Lookup functoid as we learned in above description.
You can find 4 inputs added for DatabaseLookup functod
shown in right side image.


First parameter mapped from “InputEmp” schema
field name called empName

Second parameter clearly says that its
Connection string for your database.

Third parameter employee is the Table
Name what we defined in beginning.

Fourth parameter EmployeeName is
Column name of the Table.

SELECT EmployeeName,
JobGrade,
NetSalary
FROM Employee ( 3rd parameter)
Where EmployeeName = { ? }
(4th parameter) (1st parameter)


Now you have successfully written SQL Query in BizTalk DatabaseLookup Functoid. What next??

Once query is executed you need to find salary for requested employee that is NETSALARY.


To find NetSalary column you need to use Value
Extractor functoid. Establish a link between

DBLookup functoid and Extractor functoid and
add additional parameter with name NetSalary
shown in image.


Once you through with these settings create a links between Dblookup functoid and Error Return functoid. This functoid helps to track the database errors.


Your final mapping should look as shown the image below.


Before you test the map you need to generate Input XML file for InputEmp schema.
Here is my generated input xml file. And I saved as Testmap.xml at C: directory.


Select the mapEmp.btm form your Solution and Right click and select the properties, enter the below settings.

TestMap Input Instance = c:\Testmap.xml
TestMap Input = XML
TestMap Output = XML

now lets try to test the map. Select the mapEmp.btm form your Solution and Right click and select “Test Map” you can find the generated file in your output window. When you open the file you will see the result as shown below.


Looks perfect… what about the error Description? Is it working??
let try this.. I am trying to make my database to be offline ( Right click your database à Tasksà Take Offline )

When I do Test Map I could see the below result..


However this method can apply for your map only when you know that database is not going to change for your various environments like UAT and production.


If you database name is different for each environment I suggest you to go for Business Rules rather than Db Look up fuctoids.






Thursday 5 June 2008

Working with SQL Adapter Receive Port 4 Steps

Receive SQL Server Table records using SQL Adapter and transform into XML File in 4 Steps

Create the Solution and Project name and schema etc as mentioned below

Object :
Finding summary of Employees from Employee table and transform to XML file. The extracted data would be sending to new File Share location.

Solution Name : SqlReccteiveTest.sln
Project Name : SQLReceiveTestProject
Map Name : mapEmployeeSummary.btm
Schema Names : EmployeeSummary.xsd , SQLService_EmployeeData.xsd
Orchestraion Name : SQLReceivePortTest.odx


Create a simple Table in SQL Server database as mentioned below.


CREATE TABLE [dbo].[Employee](
[EmployeeName] [varchar](50) ,
[JobGrade] [char](1) ,
[NetSalary] [money] NULL
) ON [PRIMARY]


Step-1 :
How to extract Employee Table from BizTalk ?

Select your Project (SQLReceiveTestProject) then Right click (mouse) and click ADD and select “Add Generated Items” you can find the below screen.


Then Click on ADD to continue to generate the schema.

Once its moves to next screen you need to identify the SQL Adapter from the list of adapters shown in the box and click Next , you will find the next screen and click SET Button.


(Note : SQL Server Name and Database Name at this point of time )

Here is the place you need to enter your SQL server Name and your Database name
(If you are Sql server authentication mode then enter UserID, Password of your Server)

The next screen prompts you to enter the schema specifications like TargetNamespace, PortType and document Root element Name. Enter the Details as mentioned below.

TargetNameSpace :
http://SQLReceive/EmployeeData
Port Type : Receive Port
Document Root Element : EmployeeRoot
Click on Next and select the Statement Type Information as “Select Statement
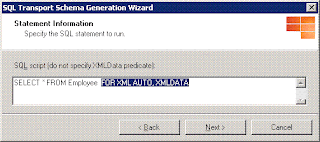
Click Next and enter the SQL Query, here I am selecting the list of Employees from the Employee Table.( You can write your joins query also)

In the below screen you can find the couple of Keywords are highlighted, these keywords are mandatory to append your Complex Query which helps adapter to generate your records into XSD schema.

For your better understanding of XML Auto and XMLDATA visit :
http://msdn.microsoft.com/en-us/library/ms188273.aspx
Click Next and Next to complete the schema extraction, You can find the SQLService.xsd at your solution. Rename the File to “SQLService_EmployeeData.xsd”.

Observe your schema has the root element name as “EmployeeRoot” and the target name as
http://SQLReceive/EmployeeData. (These details you entered while you extract the schema)


Step-2: How to Map your Employee Schema to Employee Summary Schema?

Select your Project (SQLReceiveTestProject) then Right click (mouse) and click ADD and select “New Item”.

Select the “Schemas Files” from the BizTalk Project Items and Select “Schema” form the Visual Studio Installed templates. This screen prompts you to enter the Name of the Schema in bottom
of the screen. Write “EmployeeSummary.xsd” as your new Schema name.

Rename the root Element as "EmployeeSummary" and add Child Record to the Root node and name it as EmployeeData. Then add Child Field Elements under Record node. The final structure has to me in below high racial way.


EmployeeSummary ( root)
EmployeeData (Record)
EmployeeName (Field)
EmployeeJobGrade (Field)

EmployeeNetSalary (Field)

Creating Map

Select your Project (SQLReceiveTestProject) then Right click (mouse) and click ADD and select “New Item”.

Select the “Map Files” from the BizTalk Project Items and Select “Map” form the Visual Studio Installed templates. This screen prompts you to enter the Name of the Map in bottom of
the screen. Write “mapEmployeeSummary.btm” as your new map name.

MapEmployeeSummary map contains source and destinations of the schema, which you would like to transform. Select SQLService_EmployeeData.xsd as your Source and EmployeeSummary.xsd as your destination schema

Source Schema : SQLService_EmployeeData.xsd
Destination Schema : EmployeeSummary.xsd

Map your Fields accordingly the final mapping should look as shown in below screen shot.


Step-3: How to transform your Employee data to xml File?

Creating Orchestration

Follow the Step 2 (Fig 1.5) to create orchestration and name it as “SQLReceivePortTest.odx”.
Drag and Drop the Receive, Send and Transform shapes into the orchestration design layout.
Add 2 new messages and name it as receiveSQLMsg and sendXMLMsg respectively.

Set the properties for each shape and Messages as mentioned below.


Message properties :

ReceiveSQLMsg
MessageType : SQLReceiveTestProject.SQLService_EmployeeData

sendXMLMsg
MessageType : SQLReceiveTestProject.EmployeeSummary


Receive and Send Shape properties :
Receive Shape
Message : receiveSQLMsg
Name : receiveSQLTableData
Operation : receiveSQLTablePort.ReceivePort.Request

Send Shape
Message : sendXMLMsg
Name : SendXMLFile
Operation : sendXMLFilePort.SendPort.Request


Construct Message
Message Constructed : sendXMLMsg
Name : Convert SQLMsg To XML Msg

Transform Shape
Input Messages : receiveSQLMsg
Map Name : SQLReceiveTestProject.mapEmployeeSummary
Name : SQL to XML
Output Messages : sendXMLMsg

After complete the above steps you will find the orchestration as mentioned below


Generate SN key (ex: abc.snk) add generated SN key to your Project and
(Project -> Properties -> Assembly -> Assembly Key File = abc.snk ) deploy your application

Go to BizTalk Admin Console and Biztalk Group, you can find your application sitting under the list.

(Assume that you mentioned the proper application name in Project properties)


Step-4: How to Configure the Application and execute ?

Development part has completed and the configuration comes into the picture now. In this section you need to understand how to configure your application with receive and send ports and how to call your existing extracted schema in receive port.

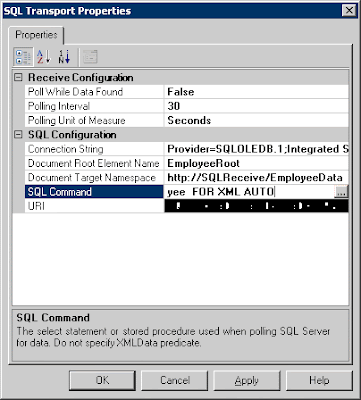
Create Receive Port and name it as “ReceiveSQLTableDataPort” and then create Receive Location name it as “receiveTableData”. Here you need to be bit careful to configure your sql Server settings to pick the data from your right database and table.

SQL Port Configuration properties :

Connection String : Provider=SQLOLEDB.1;Integrated Security=SSPI;

Persist Security Info=False;Initial Catalog=YourDBName;
Data Source=ServerName

Document Root Element Name : EmployeeRoot
Document Target Namespace :
http://SQLReceive/EmployeeData
SQL Command : SELECT * FROM Employee FOR XML AUTO

(Make sure that you did not enter the XMLDATA keyword at this level)

(Note : Receive Pipeline should be “XMLReceive” only. If you mention as “PassThruReceive” you will end up with un-necessary errors. You will not receive the message to your subscriber.)
The final output(Summary of Employees) has converted as XML File , here you need to Create new Send Port which grab the XML message from BizTalk message box and send to destination folder.

Send Port and name : SendXMLFile
Transport Type : FILE
Send Pipeline : XMLTransmit

File Transport Destination Folder : D:\SQLTest\
File Name : %MessageID%.xml

Final Binding of your receive and Send ports to Orchestration as shown in Screen shot.


Once you complete the above step Enlist your Ports and start the application. You can find the output xml File in your D:\SQLTest\ Folder. Each file will be generated with unique MessageID.


Hope you received the message without any issues. If you have any issues check the ports are configured properly or SQL Server is up and running properly.

Once you complete the above step Enlist your Ports and start the application. You can find the output xml File in your D:\SQLTest\ Folder. Each file will be generated with unique MessageID.

Hope you received the message without any issues. If you have any issues check the ports are configured properly or SQL Server is up and running properly.


Note : this can be done without Orchestion also.