Friday, 15 August 2008

Parallel Branching BizTalk 2006

How to use Parallel Branching in BizTalk 2006

Object : How to use parallel Branching in Biztalk 2006
Solution Name : ParallelCheck
Project Name : ParallelCheck
Map : MapSingle.btm,mapOrderInsertSQL.btm,MapMultipleOrders.btm

The word “Parallel” means two or more activities to be run simultaneously without depend on any other object.
When you talk about technical terms two are more objects to be execute simultaneously.

In this example I created an Order form, which can have Single Order details or Multiple Order details. However for each order I need to track the Order data and store into my SQL Table.

For each Single Order form it creates a Complete Order from output file with “Single” as extension and for each multiple order form it creates a Complete Order form output file with “Multiple” as extension. Apparently for each Single and Multiple orders I am trying to track the order details and storing the data in SQL Table. The table structure as defined below.


When ever it receives a Order from the orchestration Parallel branch checks the Orders count and executes the branch accordingly.

You need to write the below sample code for counting the Orders.
OrderCount= System.Convert.ToInt16(xpath(InputOrderMsg,"count(/*[local-name()='Root' and namespace-uri()='http://ParallelCheck.Orders']/*[local-name()='OrderDetails' and namespace-uri()=''])"));

If the form contains only 1 order details then the parallel branch quickly runs into Single Order process branch and performs the action and if order count is 2 or more it goes to Multiple Order Branching.

Simultaneously Track Order branch will execute for each Single or multiple branch executions, and it performs a SQL Insert action using SQL Send port.


For better understanding of how to work with SQL Receive and send port, check the below links
http://rajwebjunky.blogspot.com/2008/02/biztalk-sql-adapter.htmlhttp://rajwebjunky.blogspot.com/2008/06/working-with-sql-adapter-receiveport-4.html


Download the Source code :


If you need any more clarifications, reach me @ raj.webjunky@yahoo.com.

Thursday, 7 August 2008

BizTalk Server R2 Download ,Install guide and CAB Files

BizTalk Server R2 Download, Install Guide and CAB Files

I have been trying to find the one website where I can get complete information about free download of BizTalk R2 ,installation Guide and CAB Files.

Everytime I do a anonymous search to find these details , To day I got an idea to club these useful information and documenting on my blog.

Hope you can find these details when you google it , but you might be find the details in various places.

Microsfoft BizTalk R2 Evaluation Download

http://www.microsoft.com/downloads/details.aspx?familyid=54EA1E0C-937A-45DB-B51E-D0C602543EC8&displaylang=en

System Requirements and Installation Guide
http://www.microsoft.com/downloads/details.aspx?familyid=54EA1E0C-937A-45DB-B51E-D0C602543EC8&displaylang=en#Requirements

CAB Files

Windows 2003 Server 32–bit :
http://go.microsoft.com/fwlink/?LinkId=54668

Windows 2003 Server 64–bit : http://go.microsoft.com/fwlink/?LinkId=54659

Windows XP 32-bit :http://go.microsoft.com/fwlink/?LinkId=54686

Windows XP 64-bit :http://go.microsoft.com/fwlink/?LinkId=54677

Windows 2000 Server 32-bit :http://go.microsoft.com/fwlink/?LinkId=54695

Windows 2000 Server 64-bit :http://go.microsoft.com/fwlink/?LinkId=54704


Tuesday, 5 August 2008

XSLT Script file using at BizTalk Map

How to Call XSLT Script file instead of BizTalk Map and some of general key words of XSLT programming.

Object : Creating Custom Functoid, which can add leading Zeros and right align for the input number.
Solution Name : XSLT_Test
Project Name : XSLT_Test
Map : mapXSLT.btm
XSD schemas : CommonOrder.xsd, OrderSummary.xsd
XSLT Script File : MapScript.xslt

Some of key thinks for your XSLT programming.


Below mentioned is the basic template for your XSLT mapping


I designed my Input Schema as below.

Write the below sample code instead of <>


I have OrdSummary node in 3 different places and TotalCount and Amount Fields are also same. when I use Count() function It returned to me as the result 3 because I am using // keyword.


Select your Map grid and right Click -> properties and enter your XSLT map name at Custom XSL path(See the image).


Some of useful functions


Count() : Count the node set. Ex : Count()
Sum() : Returns the sum of all nodes in the node-set Ex : Sum ()
concat(string, string, string*) : Concatenate the strings.Ex : concat(“a”, “abc”)
string-length() : Retuns the length of your input Field Ex : string-length()

If you need any more clarifications for XSLT programming , reach me @ raj.webjunky@yahoo.com.

Thursday, 31 July 2008

Delimited Flat File BizTalk

I have been receiving lot of mails for how to create delimited flat file in Biztalk. I know this is very simple and basic thing , however the new learners could be a difficult.

Guys who are expert in creating flat file ,please ignore this.

Delimited Flat File Settings

Schema Level- Properties

Schema Editor Extensions = Flat File Extension
Default Child Delimiter Type = None
Default Child Order = Conditional Default


Root level Properties - It identifies /n or /r/n Character
Child Delimiter = 0x0D 0x0A ( for unix 0x0A )
Default Child Delimiter Type = Hexadecimal
Default Child Order = Postfix


Record level Properties - It identifies , Character for records
Child Delimiter = ,
Default Child Delimiter Type = Character
Default Child Order = Infix


Example : Save below data into Abc.txt
1,John,5600,A
2,Alister,5800,B
3,Philip,5600,A
Let me know if you need any more clarifications , you can reach me at raj.webjunky@yahoo.com

Monday, 14 July 2008

Creating Custom Functoids in BizTalk

How to Create Custom Functoid ?
Create the C# Class Library Project as mentioned below


Object : Creating Custom Functoid, which can add leading Zeros and right align for the input number.
Solution Name : ZeroFormater.sln
Project Name : ZeroFormater
Class : ZeroFormater.cs
ResourceFile : ZeroFormaterRes.resx


Before we start writing code, will try to understand the basic concepts of Custom Functoid.
I can understand reading the below content is too boring to you, however it would be better to recollect the concepts once.

I aimed to create a custom functoid which can accept any number and convert to Right align value with specified number of leading Zeros and decimal characters. So I called it as “ZeroFormater”.

If I want to convert 234.45 to 0000234.45 , I cannot use any of existing functoid provided by Microsoft unless I write scripting function(if you need this functionality for 2 or many times you do not have any choice to write same code ). I am trying to achieve this by creating custom functoid.

What is Custom Functoid ?
BizTalk provides a fairly full toolbox of functoids, which will sufficient for your needs. However you will encounter occasions where you can't find just the right operation for your needs. That is where custom functoids come in the picture.

You can create a custom functoid by deriving from the Microsoft.BizTalk.BaseFunctoid class (implemented by Microsoft.BizTalk.BaseFunctoids.dll )

Key things to be remember

Ø Functoid ID should start from 6000
Ø Use Resource to represent the Tooltip, Icon, Functoid Name and description.
Ø Use only 16x16 pixel bitmap Image for Functoid Icon
Ø Copy the DLL at \ Microsoft BizTalk Server 2006\Developer Tools\Mapper Extensions
Ø
Attach Assembly key file to your project before you Build

Creating Class

Add a new class to your project and name it as ZeroFormater.cs and import the below namespaces

using Microsoft.BizTalk.BaseFunctoids;
using System.Reflection;

Create namespace as “ZeroFormater” and Public class as “RightalignZeroFormater”
Write the below code.
Add new Resource Item and rename it as ZeroFormaterRes.resx and add 3 new strings as mentioned below.


ZFORMATER_DESC : ZeroFormater accepts 3 parameters and it converts to Right align leading zero format.Fist parameter : Should be your input string. second parapter: Length of your sting before decimal place.Third parameter: How many characters after decimal place
ZFORMATER_NAME : ZeroFormater

ZFORMATER_TOOLTIP : RightAlignLeadingZerosFormater

Now Add new “BitMap File” to your project and rename it as ZFORMATER_BITMAP.bmp


Create a CustomFunctoid.snk and attach to your Solution. And write a single line of code to your
AssemblyInfo.cs as mentioned below.

[assembly: AssemblyKeyFile("CustomFunctoid.snk")]

Here the brief outlook of your solution after completing the above steps.
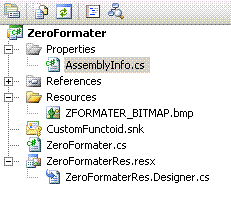


We are 50% of the work completed for creating custom functoid. Now lets start write the actual code.

namespace ZeroFormater
{
// Adding Zeros to your Input value and right aligned.
public class RightalignZeroFormater : BaseFunctoid
{

public RightalignZeroFormater()
{
this.ID = 6990;
this.SetupResourceAssembly("ZeroFormater.ZeroFormaterRes", Assembly.GetExecutingAssembly());


this.SetBitmap("ZFORMATER_BITMAP");
this.SetDescription("ZFORMATER_DESC");
this.SetName("ZFORMATER_NAME");
this.SetTooltip("ZFORMATER_TOOLTIP");

//Define the number of parameters to your Functoid
this.SetMinParams(3);
this.SetMaxParams(3);

//determines which function of the class will be used when the Functoid is invoked
this.SetExternalFunctionName(GetType().Assembly.FullName,
"ZeroFormater.RightalignZeroFormater", "GlobalDecimalFunctoid");

//defining category in toolbox, and decides under which category the
functoid will be added.
this.Category = FunctoidCategory.String ;

//define output
this.OutputConnectionType = ConnectionType.AllExceptRecord;

// Parameter 1
this.AddInputConnectionType(ConnectionType.AllExceptRecord);
// Paramter 2
this.AddInputConnectionType(ConnectionType.AllExceptRecord);
// Paramter 3
this.AddInputConnectionType(ConnectionType.AllExceptRecord);
}


Now we try to understand what this code is?

this.ID = 6990;
we I mentiond above the id should start from 6000, here I am using 6990 as my functoid id.

You need to set a number of input Parameters for your functoid.
this.SetMinParams(3);
this.SetMaxParams(3);

The below lines indicates that what is the Icon you would like to display at design time for your Functoid and what is your brief description about you functiod which en-user can understand(try to write short and user understablele words), Then Name of your functoid and tooltip.

this.SetBitmap("ZFORMATER_BITMAP");
this.SetDescription("ZFORMATER_DESC");
this.SetName("ZFORMATER_NAME");
this.SetTooltip("ZFORMATER_TOOLTIP");


Here you need to specify your actual function. Here I added my function name GlobalDecimalFunctoid which can add leading Zeros and right align format.

this.SetExternalFunctionName(GetType().Assembly.FullName,
"ZeroFormater.RightalignZeroFormater", "GlobalDecimalFunctoid");

this.Category = FunctoidCategory.String - which tab of the toolbox should display the functoid

Here you can see the functionality of GlobalDecimalFunctiod.

//Genarate Right Align Format.
public string GlobalDecimalFunctoid( string GValue,
Int16 LengthBeforeDecimal,
Int16 LengthAferDecimal
)
{
double dblValue = 0;
string GetTmpFormat = "";
if (GValue == "" GValue == null)
{
dblValue = 0;
}
else
{
dblValue = System.Convert.ToDouble(GValue);
}
GetTmpFormat = GenerateZeros(LengthBeforeDecimal) + "." + GenerateZeros(LengthAferDecimal);
return dblValue.ToString(GetTmpFormat);
}

//Generating Zeros
public string GenerateZeros(Int16 iCount)
{
string ConString = "";
for (Int16 i = 0; i < constring =" ConString" style="color:#3333ff;">return ConString;
}


Few more steps to complete the build. Lets write few lines of code to you ZeroFormaterRes.Designer.cs Class.

Add the below piece of lies at the end of the ZeroFormaterRes class which can helps to pick the Image from your resource File for your Custom functoid.

internal static System.Drawing.Bitmap ZFORMATER_BITMAP {
get {
object obj = ResourceManager.GetObject("ZFORMATER_BITMAP", resourceCulture);
return ((System.Drawing.Bitmap)(obj));


Also Select ZeroFormaterRes.resx file and Right Click and then select View Code. You might be seeing a XML file. Write the below lines which helps to pickup


" < name= " ZFORMATER_BITMAP " type="System.Resources.ResXFileRef, System.Windows.Forms">
Resources\ZFORMATER_BITMAP.bmp;System.Drawing.Bitmap, System.Drawing, Version=2.0.0.0, Culture=neutral, PublicKeyToken=b03f5f7f11d50a3a
< / data> "


If you failed to mention your correct PublicKeyToken for your System.Drawing assembly, you may not find your colorful Image for your functoid. It looks as follows.
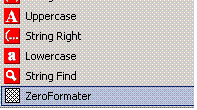

If you have a problem with Functoid image, you can do follow the below steps.
1. Restart the Windows Image Acquisition (WIA) Services
( click Start -> Run -> Services.msc)

2. Reset your BizTalk Tool Box
3. If you still face an issue – better you restart your system once.( biztalk always problem with memory refresh)

Final Steps

Build your Code and Copy your DLL to \ Microsoft BizTalk Server 2006\Developer Tools\Mapper Extensions

And GAC your assembly
Now Lets Try to use the Functoid at designer. Her is my Functoid Looks like.
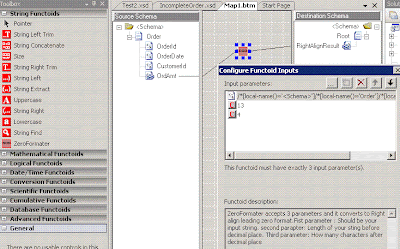


Functiond Inputs I entered 13 as my length of the string before Decimal point and 4 is the number after decimal point, below is my final Output.


Friday, 20 June 2008

DB Lookup map functoids perform Select Query

DB Lookup map functoids perform Select Query

Create the Solution and Project name and schema etc as mentioned below

Object : How to Create Select * from Employee where EmpName=’A’ using
BizTalk DB Lookup Functoids ?


Solution Name : DBLookUpTest.sln
Project Name : DBLookUpProject
Map Name : mapEmp.btm
Schema Names : InputEmp.xsd , DBOutputs.xsd

Create a simple Table in SQL Server database as mentioned below.

CREATE TABLE [dbo].[Employee](
[EmployeeName] [varchar](50) ,
[JobGrade] [char](1) ,
[NetSalary] [money] NULL
) ON [PRIMARY]

Insert few Rows in Employee Table. I got less time to insert many rows so I inserted 3 rows as shown below.
EmployeeName JobGrade NetSalary
-------------- ------------ ------------
John A 5000.0000
MikeMiles A 5600.0000
Armados B 3000.0000

If any one asked you to write a query to find salary based on selected employee, I know you can write within seconds. However to perform similar query in BizTalk you could use sophisticated method. I will guide you how to write same query in BizTalk mapping.

Let say I want to find the Employee John Salary, looking at above table structure I can easily say that its 5000/-. Lets find John same salary via BizTalk mapper.

Create Schemas
1. Add one Field under “InputEmp” Schema as empName - This should be used as
Where clause value in SQL Query.

2. Add 3 Fields under DBOutputs Schema one should filed should be dedicated for database
error descriptions. Here I designed 2 Record Nodes and 2 fields (employeename
and Salary) for EmpData Record node and one field for Status records which holds
the database error descriptions.

You can find my Schema structure as mentioned below.

Root
EmpData
EmployeeName
Salary
Status
ErroDesc

Creating Map
Hope you remember that we need to accomplish the Select Query via biztalk mapper.

Before creating mapper just try to under stand the 3 database functoids Database Lookup, Value Extractor, Error Return Functoids.

Database Lookup: This functoid used to extract information from a database and store it as a Microsoft ActiveX Data Objects (ADO) recordset. This functoid requires four input parameters in the order of lookup value, database connection string, table name and column name for the lookup value.

Value Extractor: extract the appropriate column value from a recordset returned by the Database Lookup functoid. This functoid requires two input parameters like a link to the Database Lookup functoid and a column name.

Error Return : capture information about errors, such as database connection failures, that occur during run time. This functoid requires one input parameter like a link from the Database Lookup functoid to any Error description field

In below image you can identify each functoid.

Now lets start add inputs for Database Lookup functoid as we learned in above description.
You can find 4 inputs added for DatabaseLookup functod
shown in right side image.


First parameter mapped from “InputEmp” schema
field name called empName

Second parameter clearly says that its
Connection string for your database.

Third parameter employee is the Table
Name what we defined in beginning.

Fourth parameter EmployeeName is
Column name of the Table.

SELECT EmployeeName,
JobGrade,
NetSalary
FROM Employee ( 3rd parameter)
Where EmployeeName = { ? }
(4th parameter) (1st parameter)


Now you have successfully written SQL Query in BizTalk DatabaseLookup Functoid. What next??

Once query is executed you need to find salary for requested employee that is NETSALARY.


To find NetSalary column you need to use Value
Extractor functoid. Establish a link between

DBLookup functoid and Extractor functoid and
add additional parameter with name NetSalary
shown in image.


Once you through with these settings create a links between Dblookup functoid and Error Return functoid. This functoid helps to track the database errors.


Your final mapping should look as shown the image below.


Before you test the map you need to generate Input XML file for InputEmp schema.
Here is my generated input xml file. And I saved as Testmap.xml at C: directory.


Select the mapEmp.btm form your Solution and Right click and select the properties, enter the below settings.

TestMap Input Instance = c:\Testmap.xml
TestMap Input = XML
TestMap Output = XML

now lets try to test the map. Select the mapEmp.btm form your Solution and Right click and select “Test Map” you can find the generated file in your output window. When you open the file you will see the result as shown below.


Looks perfect… what about the error Description? Is it working??
let try this.. I am trying to make my database to be offline ( Right click your database à Tasksà Take Offline )

When I do Test Map I could see the below result..


However this method can apply for your map only when you know that database is not going to change for your various environments like UAT and production.


If you database name is different for each environment I suggest you to go for Business Rules rather than Db Look up fuctoids.


Thursday, 5 June 2008

Working with SQL Adapter Receive Port 4 Steps

Receive SQL Server Table records using SQL Adapter and transform into XML File in 4 Steps

Create the Solution and Project name and schema etc as mentioned below

Object :
Finding summary of Employees from Employee table and transform to XML file. The extracted data would be sending to new File Share location.

Solution Name : SqlReccteiveTest.sln
Project Name : SQLReceiveTestProject
Map Name : mapEmployeeSummary.btm
Schema Names : EmployeeSummary.xsd , SQLService_EmployeeData.xsd
Orchestraion Name : SQLReceivePortTest.odx


Create a simple Table in SQL Server database as mentioned below.


CREATE TABLE [dbo].[Employee](
[EmployeeName] [varchar](50) ,
[JobGrade] [char](1) ,
[NetSalary] [money] NULL
) ON [PRIMARY]


Step-1 :
How to extract Employee Table from BizTalk ?

Select your Project (SQLReceiveTestProject) then Right click (mouse) and click ADD and select “Add Generated Items” you can find the below screen.


Then Click on ADD to continue to generate the schema.

Once its moves to next screen you need to identify the SQL Adapter from the list of adapters shown in the box and click Next , you will find the next screen and click SET Button.


(Note : SQL Server Name and Database Name at this point of time )

Here is the place you need to enter your SQL server Name and your Database name
(If you are Sql server authentication mode then enter UserID, Password of your Server)

The next screen prompts you to enter the schema specifications like TargetNamespace, PortType and document Root element Name. Enter the Details as mentioned below.

TargetNameSpace :
http://SQLReceive/EmployeeData
Port Type : Receive Port
Document Root Element : EmployeeRoot
Click on Next and select the Statement Type Information as “Select Statement”
Click Next and enter the SQL Query, here I am selecting the list of Employees from the Employee Table.( You can write your joins query also)

In the below screen you can find the couple of Keywords are highlighted, these keywords are mandatory to append your Complex Query which helps adapter to generate your records into XSD schema.

For your better understanding of XML Auto and XMLDATA visit :
http://msdn.microsoft.com/en-us/library/ms188273.aspx
Click Next and Next to complete the schema extraction, You can find the SQLService.xsd at your solution. Rename the File to “SQLService_EmployeeData.xsd”.

Observe your schema has the root element name as “EmployeeRoot” and the target name as
http://SQLReceive/EmployeeData. (These details you entered while you extract the schema)


Step-2: How to Map your Employee Schema to Employee Summary Schema?

Select your Project (SQLReceiveTestProject) then Right click (mouse) and click ADD and select “New Item”.

Select the “Schemas Files” from the BizTalk Project Items and Select “Schema” form the Visual Studio Installed templates. This screen prompts you to enter the Name of the Schema in bottom
of the screen. Write “EmployeeSummary.xsd” as your new Schema name.

Rename the root Element as "EmployeeSummary" and add Child Record to the Root node and name it as EmployeeData. Then add Child Field Elements under Record node. The final structure has to me in below high racial way.


EmployeeSummary ( root)
EmployeeData (Record)
EmployeeName (Field)
EmployeeJobGrade (Field)

EmployeeNetSalary (Field)

Creating Map

Select your Project (SQLReceiveTestProject) then Right click (mouse) and click ADD and select “New Item”.

Select the “Map Files” from the BizTalk Project Items and Select “Map” form the Visual Studio Installed templates. This screen prompts you to enter the Name of the Map in bottom of
the screen. Write “mapEmployeeSummary.btm” as your new map name.

MapEmployeeSummary map contains source and destinations of the schema, which you would like to transform. Select SQLService_EmployeeData.xsd as your Source and EmployeeSummary.xsd as your destination schema

Source Schema : SQLService_EmployeeData.xsd
Destination Schema : EmployeeSummary.xsd

Map your Fields accordingly the final mapping should look as shown in below screen shot.


Step-3: How to transform your Employee data to xml File?

Creating Orchestration

Follow the Step 2 (Fig 1.5) to create orchestration and name it as “SQLReceivePortTest.odx”.
Drag and Drop the Receive, Send and Transform shapes into the orchestration design layout.
Add 2 new messages and name it as receiveSQLMsg and sendXMLMsg respectively.

Set the properties for each shape and Messages as mentioned below.


Message properties :

ReceiveSQLMsg
MessageType : SQLReceiveTestProject.SQLService_EmployeeData

sendXMLMsg
MessageType : SQLReceiveTestProject.EmployeeSummary


Receive and Send Shape properties :
Receive Shape
Message : receiveSQLMsg
Name : receiveSQLTableData
Operation : receiveSQLTablePort.ReceivePort.Request

Send Shape
Message : sendXMLMsg
Name : SendXMLFile
Operation : sendXMLFilePort.SendPort.Request


Construct Message
Message Constructed : sendXMLMsg
Name : Convert SQLMsg To XML Msg

Transform Shape
Input Messages : receiveSQLMsg
Map Name : SQLReceiveTestProject.mapEmployeeSummary
Name : SQL to XML
Output Messages : sendXMLMsg

After complete the above steps you will find the orchestration as mentioned below


Generate SN key (ex: abc.snk) add generated SN key to your Project and
(Project -> Properties -> Assembly -> Assembly Key File = abc.snk ) deploy your application

Go to BizTalk Admin Console and Biztalk Group, you can find your application sitting under the list.

(Assume that you mentioned the proper application name in Project properties)


Step-4: How to Configure the Application and execute ?

Development part has completed and the configuration comes into the picture now. In this section you need to understand how to configure your application with receive and send ports and how to call your existing extracted schema in receive port.

Create Receive Port and name it as “ReceiveSQLTableDataPort” and then create Receive Location name it as “receiveTableData”. Here you need to be bit careful to configure your sql Server settings to pick the data from your right database and table.

SQL Port Configuration properties :

Connection String : Provider=SQLOLEDB.1;Integrated Security=SSPI;

Persist Security Info=False;Initial Catalog=YourDBName;
Data Source=ServerName

Document Root Element Name : EmployeeRoot
Document Target Namespace :
http://SQLReceive/EmployeeData
SQL Command : SELECT * FROM Employee FOR XML AUTO

(Make sure that you did not enter the XMLDATA keyword at this level)

(Note : Receive Pipeline should be “XMLReceive” only. If you mention as “PassThruReceive” you will end up with un-necessary errors. You will not receive the message to your subscriber.)
The final output(Summary of Employees) has converted as XML File , here you need to Create new Send Port which grab the XML message from BizTalk message box and send to destination folder.

Send Port and name : SendXMLFile
Transport Type : FILE
Send Pipeline : XMLTransmit

File Transport Destination Folder : D:\SQLTest\
File Name : %MessageID%.xml

Final Binding of your receive and Send ports to Orchestration as shown in Screen shot.


Once you complete the above step Enlist your Ports and start the application. You can find the output xml File in your D:\SQLTest\ Folder. Each file will be generated with unique MessageID.


Hope you received the message without any issues. If you have any issues check the ports are configured properly or SQL Server is up and running properly.

Once you complete the above step Enlist your Ports and start the application. You can find the output xml File in your D:\SQLTest\ Folder. Each file will be generated with unique MessageID.

Hope you received the message without any issues. If you have any issues check the ports are configured properly or SQL Server is up and running properly.


Note : this can be done without Orchestion also.